
Fetal situs detection is a crucial aspect of fetal echocardiography, and it could be challenging given that there are multiple options for fetal position in the uterus.
Determination of Fetal Lie: These methods require determining fetal orientation first, the cephalic or vertex, Breech, transverse left of right, and obliques, by aligning the USG probe along the long axis of the fetus.
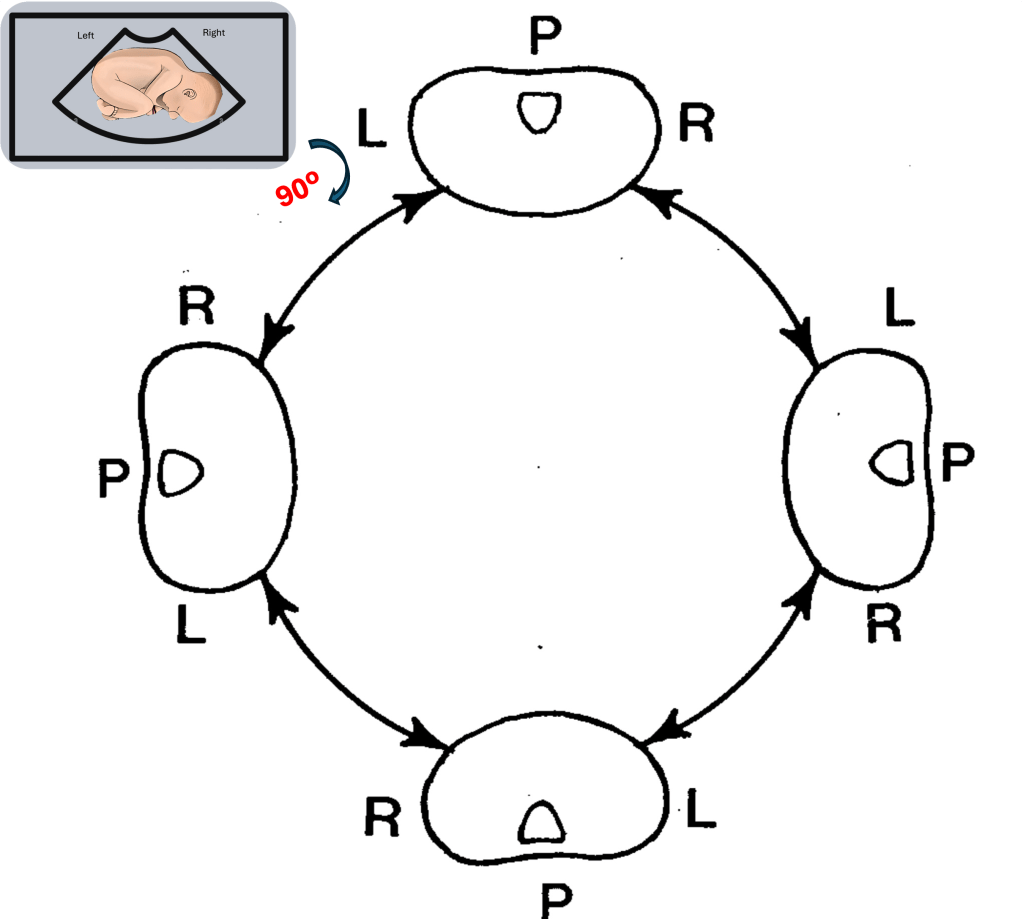
1. The Cordes et al. Method
The following steps are in the Cordes method:
- Transducer Orientation—Bringing the fetal head to the right: The transducer is maneuvered to be aligned parallel to the fetal sagittal plane, with the fetal head on the right side of the screen.
- Rotation & Image Acquisition: After rotating the transducer 90 degrees clockwise, a transverse image of the fetal thorax is captured, showing the four cardiac chambers and another with a stomach-portal vein.
- Determining Right/Left Axis: The diagram is used to determine the left and right of the fetus and matched with cardiac and stomach images to determine the situs.
2. The “Be the Baby” Method
The “Be the Baby” method encourages echocardiographers to visualize the fetal anatomy from the fetus’s perspective, enhancing understanding and accuracy. Here’s how it works:
- Determine the fetal Lie, making a long view of the fetus and understanding how the fetus is placed inside the womb.
- Shift in Perspective: As you scan, mentally adopt the fetus’s perspective, imagining yourself in that position to decide the left and right.
- Identify Key Landmarks: Focus on the heart, liver, and stomach to label the situs.

3. The Hand Fist Method
The Hand Fist Method offers a tactile and visual approach to understanding fetal organ positioning. Here’s how you can implement it:
- Form a Fist: Make a fist with your right hand. The orientation of your fist serves as a model for fetal anatomy.
- Interpretation of the Fist: The thumb represents the fetal left side, while the fist represents the head and the forearm represents the thorax and legs. The front of the hand and forearm represent the front of the fetus.
- Determine the fetal position and make the long axis of the fetus. Place the fist to match the fetus’s head and front or back. The thumb of the right hand is the left side of the fetus.
Evaluate Images: By referencing your fist model, you can accurately assess the positions of the liver and stomach, confirming situs solitus or situs inversus based on the arrangement.
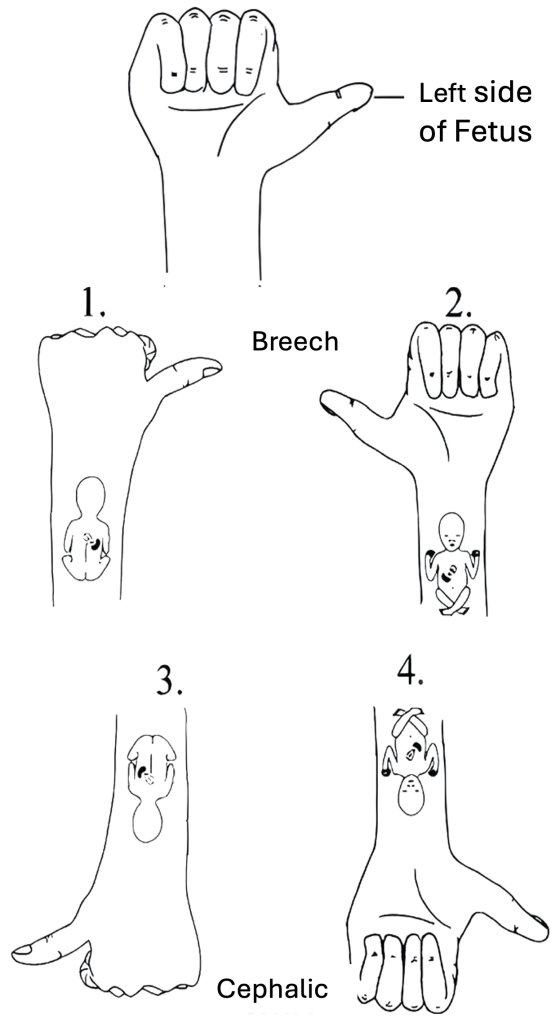
I use my left hand as a reference, labeling the left thumb as the right side of the fetus. This way, I can make a fist and position my hand appropriately, while continuing to scan with my right hand.
4. How I Determine Fetal Lie
When assessing fetal situs, the first step is determining the fetal lie. This helps me understand the orientation of the fetus within the uterus, which is crucial for correctly identifying the left and right sides of the fetus. Here’s how I do it, broken down based on the different positions:
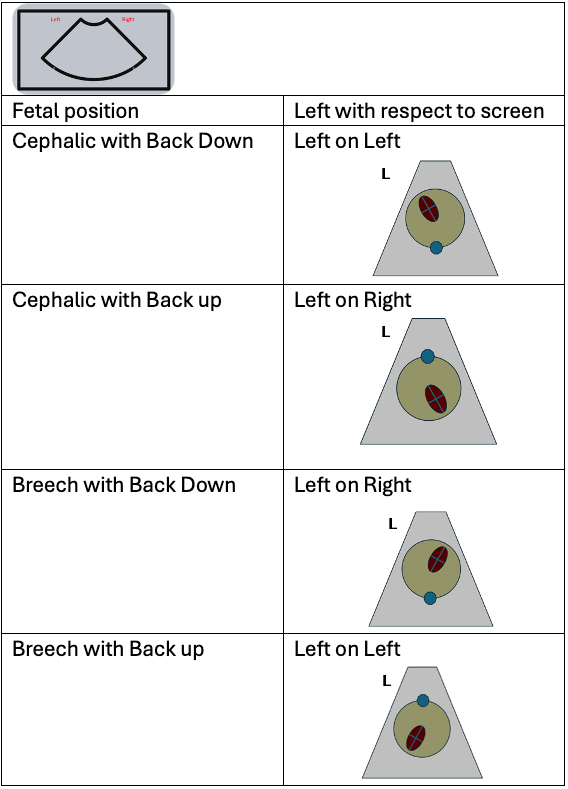
1. Cephalic or Oblique Lie (Head Lower Than the Thorax)
When the fetus’s head is lower than the chest, I follow these rules:
- Supine Fetus (fetus lying on its back):
- The fetal left side will appear on the left side of the ultrasound screen.
- Prone Fetus with Spine Up (fetus lying on its front with the spine facing upward):
- The fetal left side will appear on the right side of the screen.
2. Breech or Oblique Lie (Head Higher Than the Thorax)
When the fetus’s head is higher than the chest, such as in breech or an oblique lie, I adjust accordingly:
- Supine Fetus (fetus lying on its back):
- The fetal left side will appear on the right side of the ultrasound screen, similar to a regular echo.
- Prone Fetus with Spine Up (fetus lying on its front with the spine facing upward):
- The fetal left side will appear on the left side of the screen.
A Faster Alternative to the “Be the Baby” Method
This method is similar to the “be the baby” technique. However, this approach is quicker and less distracting, allowing you to focus on the sonography itself.
Quick Memory Tips for Fetus on Its Back:
- Cephalic (head down): The fetal left is on the left side of the screen.
- Breech (head up): The fetal left is on the right side of the screen, just like in a regular echo.
For a prone fetus, the left-right positions are reversed, but as you get used to it, identifying the left and right becomes second nature once the fetal lie is established.
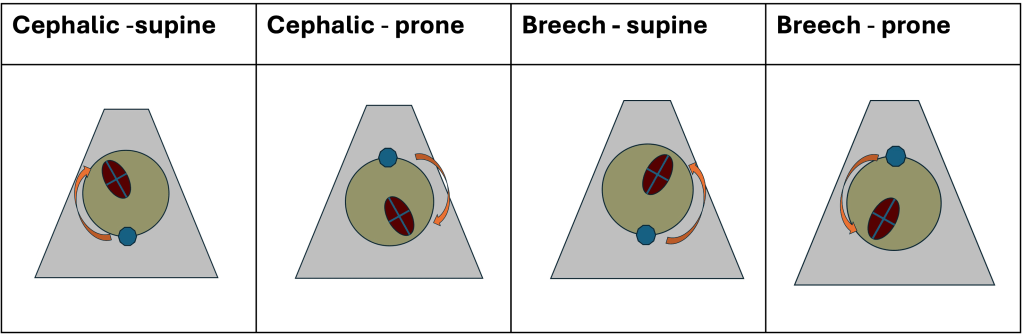
Cross-Check: Using Heart and Spine to Confirm Situs
A reliable way to double-check the fetal lie and situs is to draw an imaginary arrow from the spine to the apex of the heart:
- In the cephalic presentation, the connection between the spine and heart apex is clockwise.
- In the breech presentation, the connection is counterclockwise.
This simple technique helps ensure accurate assessment and reduces errors when interpreting the fetal orientation.
Conclusion
Each of these methodologies—Cordes et al., “Be the Baby,” and the Hand Fist method—offers unique advantages for fetal situs detection. By employing these techniques, clinicians can enhance their understanding of fetal anatomy, improve diagnostic accuracy, and ensure better prenatal care for expectant mothers. Whether through systematic imaging or imaginative visualization, these methods equip healthcare providers with the tools for effective fetal echocardiography.
Note on Ultrasound Screen Orientation and Addendum
While writing this blog and incorporating feedback, I realized that the orientation of the ultrasound screen could be confusing. To ensure consistency throughout, I have made some revisions and included an ultrasound screen image for clearer reference.
